Month: April 2014

Building a vSphere 5.5 home lab: Part 9 – iSCSI Storage

Next up is setting up storage with iSCSI. As the original article suggests I will also use Microsoft’s iSCSI solution.

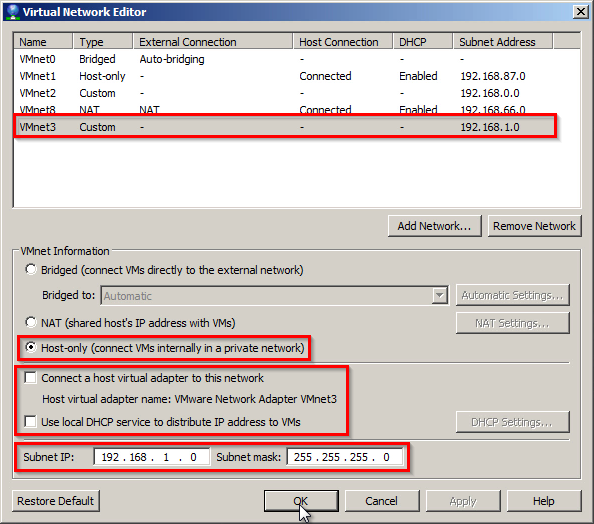
  • Make VMnet3
  • Add 2 NICS from both ESXi hosts to VMnet3

First go to VMware Workstation’s Virtual Network Editor and create a VMnet3.

2014-04-07 20_04_46-Camtasia Studio

Add another Network Adapter to the vCenter server and assign it to VMnet3.

2014-04-07 20_06_26-Camtasia Studio

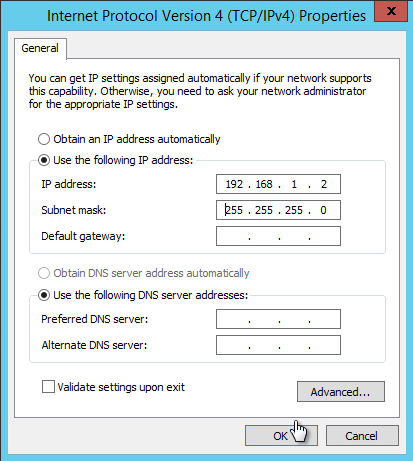
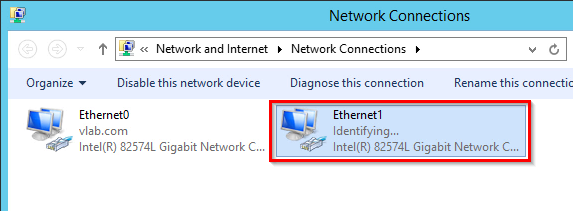
Assign an IP to the new NIC.

2014-04-07 20_09_05-Camtasia Studio

2014-04-07 20_09_26-Camtasia Studio

Next go to the each of the ESXi servers in VMware Workstation and assign the additional network adapters previously added to VMnet3.

2014-04-07 20_27_11-Virtual Machine Settings

Open Internet Explorer on the vCenter server and login to the vSphere environment https://ip-of-vcenter-server:9443/vsphere-client. Then go to vCenter -> Hosts and Clusters -> VLAB -> VLAB Cluster -> 192.168.0.11.

2014-04-07 20_16_19-VLABDKCPHVC01 - VMware Workstation

Once ESXi01 has been selected click the Networking tab and press the Add Host Networking icon.

2014-04-07 20_17_51-Camtasia Studio

Select Vmkernel Network Adatper.

2014-04-07 20_20_33-Camtasia Studio

Select New standard switch.

2014-04-07 20_21_35-Camtasia Studio

Click the green plus sign.

2014-04-07 20_22_27-Camtasia Studio

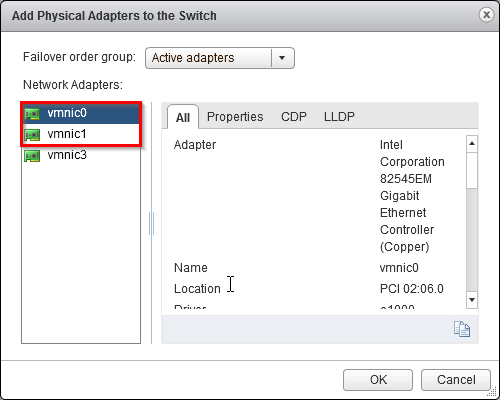
Add two adapters. Active adapters will not show up on the list, so do not worry picking one already in use.

2014-04-07 20_23_32-Camtasia Studio

If you do not have any adapters available then add some more network adapters to the ESXi server through VMware Workstation.

What it should look like;

2014-04-07 20_24_59-Camtasia Studio

Name the VMkernel for iSCSI_Initiator_1 and press Next.

2014-04-07 20_29_34-Camtasia Studio

Assign a static IP. Mine is 192.168.1.11/24.

2014-04-07 20_31_07-Camtasia Studio

Create a new VMkernel but add it to the existing vSwitch1.

2014-04-07 20_32_37-Camtasia Studio

Name it iSCSI_Initiator_2 with a static IP of 192.168.1.12.

Select vSwitch1 and the iSCSI_Initiator_2 and press the Edit icon.

2014-04-07 20_35_02-Camtasia Studio

Go to Team and failover and enable Override. Remove one of the NICs from the active adapters list to the unused adapters list.

2014-04-07 20_36_57-Camtasia Studio

Next do the same for iSCSI_Initator_1 so that each iSCSI initiator VMkernel is utilizing its very own active network adapter.

iSCSI_Initiator_1 = Active Adapter vmnic0, Unused Adapter vmnic1
iSCSI_Initiator_2 = Active Adapter vmnic1, Unused Adapter vmnic0

Follow the same steps for ESXi02. Create a new vSwitch with two iSCSI initators but assign them different IP addresses. For instance 192.168.1.13 and 192.168.1.14, and then override the failover order and change around the adapters.

Next go to Storage and add a storage adapter.

2014-04-07 20_41_25-Camtasia Studio

Copy the IQN identifier address.

2014-04-07 20_43_01-Camtasia Studio

Next create a new hard disk on the vCenter server. I have 1TB non-SSD hard disk that I am using for other stuff. I have 600gb available on that disk and I will be spending 300gb for the VM storage. I will not be running a lot of VMs to start with anyway so this will suffice for now. Remember to place the VMDK file somewhere else than the SSD.

2014-04-07 20_44_40-Camtasia Studio

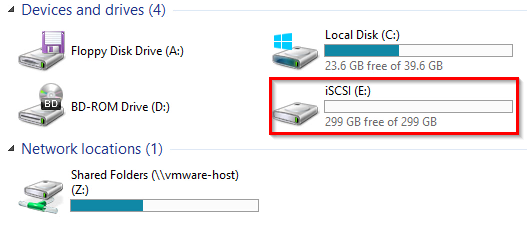
Then initialize the disk so it is usable. This will be the iSCSI storage E.

2014-04-07 20_49_01-Camtasia Studio

Next go to Server Manager and Add a new role. Expand File And Storage Services -> File and iSCSI Services and select iSCSI Target Server.

2014-04-07 20_50_39-Camtasia Studio

2014-04-07 20_52_15-Camtasia Studio

Select To create an iSCSI virtual disk, start the New iSCSI Virutal Disk Wizard.

2014-04-07 20_52_47-Camtasia Studio

Select the E drive created earlier.

2014-04-07 20_53_55-Camtasia Studio

Name it Datastore1.

2014-04-07 20_56_32-Camtasia Studio

Select about half of the total iSCSI drive and then select Dynamically expanding. I would not recommend fixed size as this would allocate all the space straight away, and since I do not know if I will be using all of the space then it is better to choose dynamic.

2014-04-28 20_17_27-VLABDKCPHVC01 - VMware Workstation

Select New iSCSI target.

2014-04-07 21_00_17-Camtasia Studio

Name it by the FQDN of the ESXi servers.

2014-04-28 20_17_00-VLABDKCPHVC01 - VMware Workstation

Click Add.

2014-04-07 21_02_52-Camtasia Studio

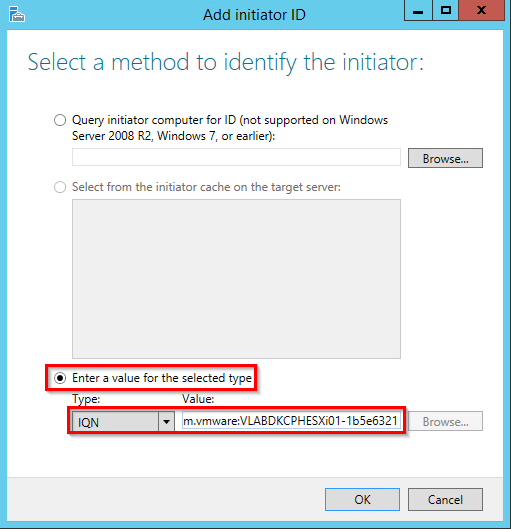
Select Enter a value for the selected type and paste the IQN identifier of the first ESXi serverfrom the vSphere environment in here.

2014-04-07 21_03_32-Camtasia Studio

Add both of the iSCSI adapter IQN identifiers. One IQN identifier from each ESXi server.

2014-04-28 19_53_01-VLABDKCPHVC01 - VMware Workstation

Finish the wizard with no additional configured settings.

Go to Tasks and select New iSCSI Virtual Disk.

2014-04-07 21_05_54-Camtasia Studio

Select the 300GB (E) drive.

2014-04-07 21_09_21-Camtasia Studio

Name it Datastore2.

2014-04-07 21_10_18-Camtasia Studio

Again assign half of the total iSCSI storage drive and select the Dynamically expanding. The reason I am giving 149GB and 148GB to Datastore1 and Datastore2 respectively is being able to identify which virtual disk needs fixing in case of a break down.

2014-04-28 20_24_09-VLABDKCPHVC01 - VMware Workstation

Choose the Existing iSCSI target.

2014-04-28 20_27_17-VLABDKCPHVC01 - VMware Workstation

Finish the wizard with no additional settings to create the new iSCSI virtual disk.

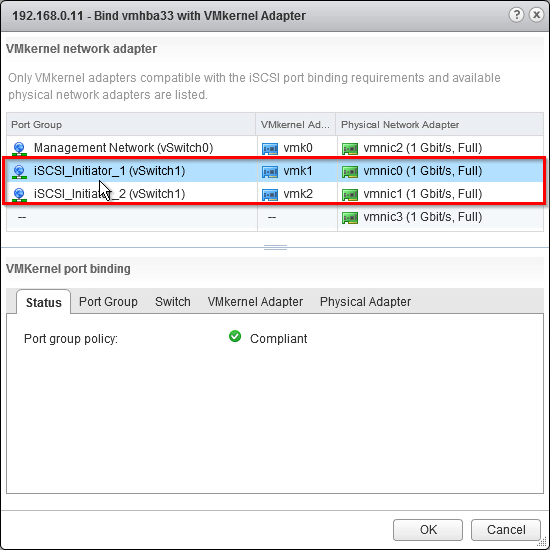
Go back to the vCenter and make sure the newly created iSCSI adapter is selected on ESXi01. Then go to Network Port Binding and press the Add icon.

2014-04-07 21_14_16-Camtasia Studio

Add both of the VMkernel iSCSI initiators.

2014-04-07 21_18_26-Camtasia Studio

What it should look like;

2014-04-07 21_19_25-Camtasia Studio

Next select the Targets tab and the Dynamic Discovery and then press Add.

2014-04-07 21_20_17-Camtasia Studio

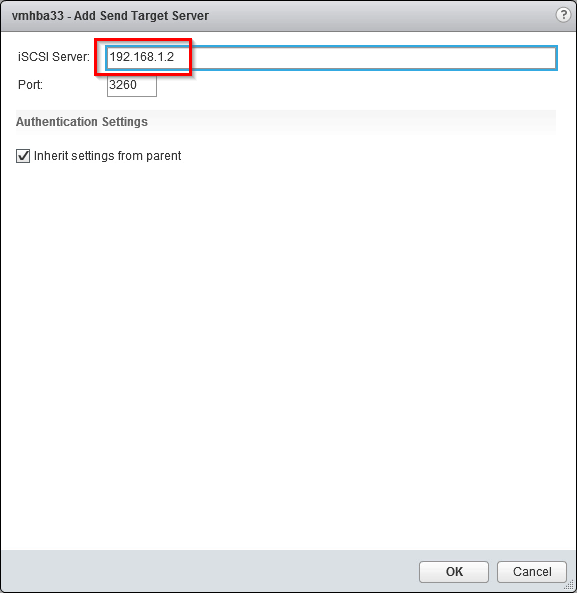
Type the IP of the iSCSI server which in my case is 192.168.1.2.

2014-04-07 21_21_57-Camtasia Studio

Rescan the adapter and the LUNs should appear.

2014-04-07 21_23_06-Camtasia Studio

Repeat this on ESXi2.

Two LUNs should appear on each of the ESXi servers with 4 paths each. This will allow failover.

2014-04-28 20_30_48-VLABDKCPHVC01 - VMware Workstation

2014-04-28 20_41_35-VLABDKCPHVC01 - VMware Workstation


Building a vSphere 5.5 home lab: Part 1 – VMware Workstation 10 configuration

Building a vSphere 5.5 home lab: Part 2 – Base Template

Building a vSphere 5.5 home lab: Part 3 – Prepare the base template

Building a vSphere 5.5 home lab: Part 4 – Domain Controller

Building a vSphere 5.5 home lab: Part 5 – The SQL Server

Building a vSphere 5.5 home lab: Part 6 – The vCenter Server

Building a vSphere 5.5 home lab: Part 7 – Install Elastic Sky X Integrated

Building a vSphere 5.5 home lab: Part 8 – Add hosts to the vCenter

Building a vSphere 5.5 home lab: Part 9 – iSCSI Storage
 

Building a vSphere 5.5 home lab: Part 8 – Add hosts to the vCenter

Go the the vCenter server and enable the Desktop Experience. The server will restart a few times. The desktop experience enables one to utilize the embedded Flash in IE11 which is something the vCenter server needs to access the vSphere environment through the web browser.

2014-04-06 16_40_47-Camtasia Studio

Type https://ip-of-vcenter-server:9443/vsphere-client in the web browser and select Continue to this website (not recommended) on the following page.

2014-04-06 19_03_39-Camtasia Studio

Type the administrator@vsphere.local as the user name and then the SSO password.

2014-04-06 19_06_45-Camtasia Studio

Go to vCenter.

2014-04-06 19_08_53-Camtasia Studio

Then go to vCenters Servers.

2014-04-06 19_09_26-Camtasia Studio

Select the vCenter FQDN and press Create Datacenter. No hosts can be added without first having a datacenter.

2014-04-06 19_09_59-Camtasia Studio

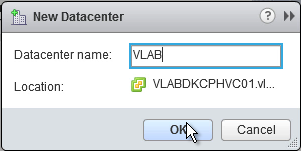
Name it.

2014-04-06 19_10_51-Camtasia Studio

Click Create a cluster.

2014-04-06 19_11_32-Camtasia Studio

Name it and leave everything at default. Do not turn on anything yet. It can be turned on later when storage is available.

2014-04-06 19_12_11-Camtasia Studio

Now click Add a host.

2014-04-06 19_12_35-Camtasia Studio

Type the IP of the first ESXi.

2014-04-06 19_13_14-Camtasia Studio

Type root and the root password created during the ESXi installation.

2014-04-06 19_14_08-Camtasia Studio

Finish the wizard and add the 2nd host too.

Then click the house on top of the screen (Home) and then choose Hosts and Clusters.

2014-04-06 19_15_55-Camtasia Studio

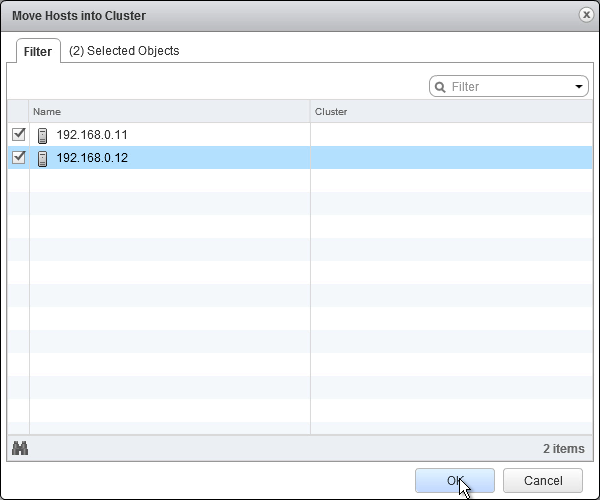
Expand VLAB and right-click the cluster. Choose Move Hosts into Cluster.

2014-04-06 19_17_07-Camtasia Studio

Select both ESXi hosts.

2014-04-06 19_18_48-Camtasia Studio

And this is what is should look like.

2014-04-06 19_19_15-Camtasia Studio


Next up: Building a vSphere 5.5 home lab: Part 9 – iSCSI Storage

Building a vSphere 5.5 home lab: Part 1 – VMware Workstation 10 configuration

Building a vSphere 5.5 home lab: Part 2 – Base Template

Building a vSphere 5.5 home lab: Part 3 – Prepare the base template

Building a vSphere 5.5 home lab: Part 4 – Domain Controller

Building a vSphere 5.5 home lab: Part 5 – The SQL Server

Building a vSphere 5.5 home lab: Part 6 – The vCenter Server

Building a vSphere 5.5 home lab: Part 7 – Install Elastic Sky X Integrated

Building a vSphere 5.5 home lab: Part 8 – Add hosts to the vCenter

Building a vSphere 5.5 home lab: Part 9 – iSCSI Storage

Building a vSphere 5.5 home lab: Part 7 – Install Elastic Sky X Integrated

Installing ESXi

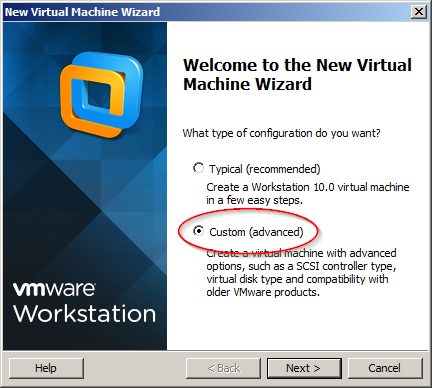
Create a new virtual machine and select Custom.

2014-04-01 19_53_58-New Virtual Machine Wizard

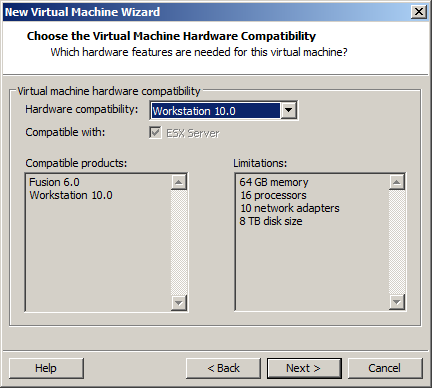
Select Workstation 10.0 as the Hardware compatibility.

2014-04-01 19_54_52-New Virtual Machine Wizard

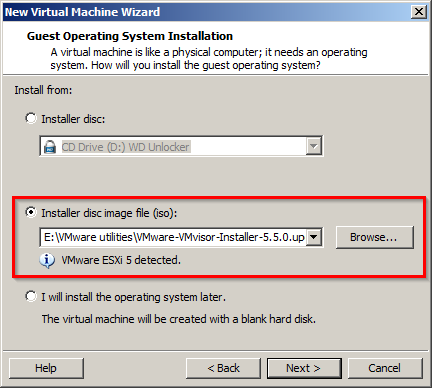
Mount the ISO.

2014-04-01 19_55_47-New Virtual Machine Wizard

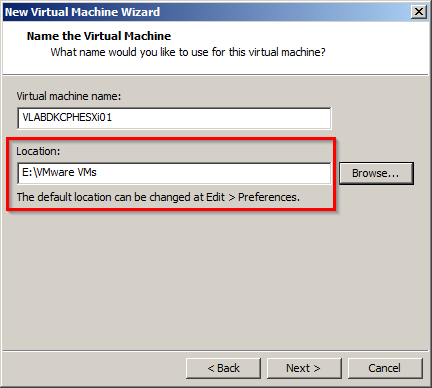
I have chosen a normal HDD to locate the ESXi because it does not require high performance.

2014-04-01 19_57_39-New Virtual Machine Wizard

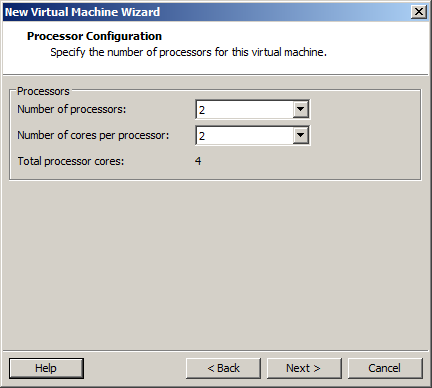
I will play around with the CPU scheduler at some point so I will stack it some extra cores.

2014-04-01 20_00_05-New Virtual Machine Wizard

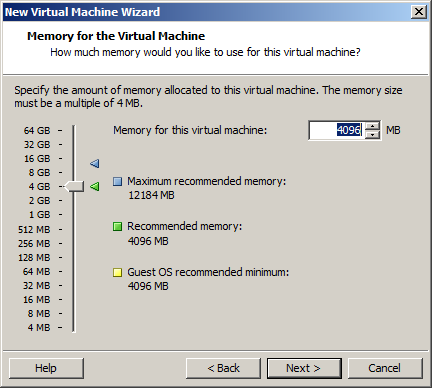
I will assign 4GB to each ESXi even if it will get a little tight since the vCenter has also required 4GB already. I will try this out and see how it works out.

2014-04-01 20_01_05-New Virtual Machine Wizard

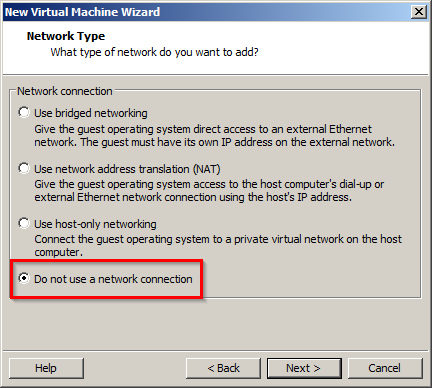
Select Do not use a network connection.

2014-04-01 20_03_11-New Virtual Machine Wizard

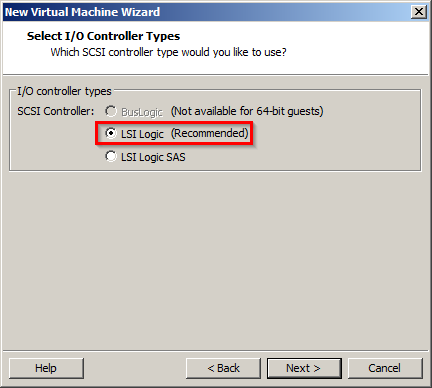
Select LSI Logic (Recommended).

2014-04-01 20_04_03-New Virtual Machine Wizard

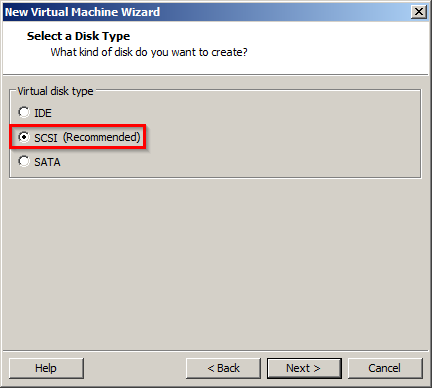
Select SCSI (Recommended).

2014-04-01 20_05_02-New Virtual Machine Wizard

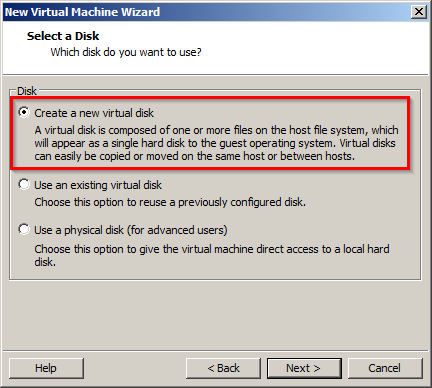
Select Create a new virtual disk.

2014-04-01 20_05_53-New Virtual Machine Wizard

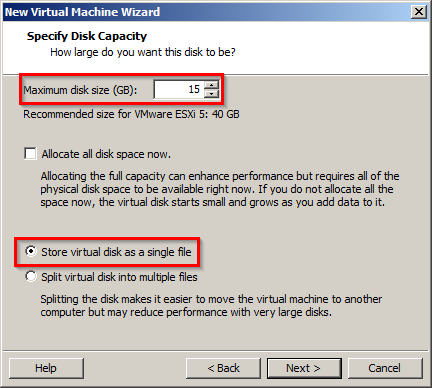
Assign it 15GB and Store virtual disk as a single file (no idea why they recommend 40GB. I usually install ESXi on an 8GB flash drive inserted into the motherboard of a server).

2014-04-01 20_07_02-New Virtual Machine Wizard

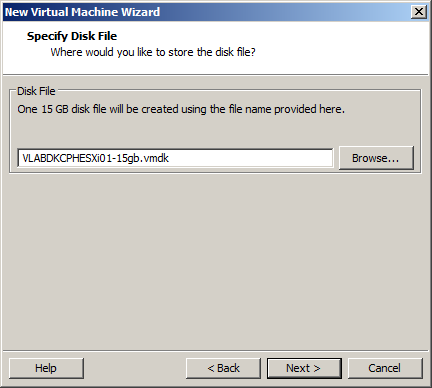
Put 15gb at the end of the name so it is easier to identify it if ever needed.

2014-04-01 20_08_47-New Virtual Machine Wizard

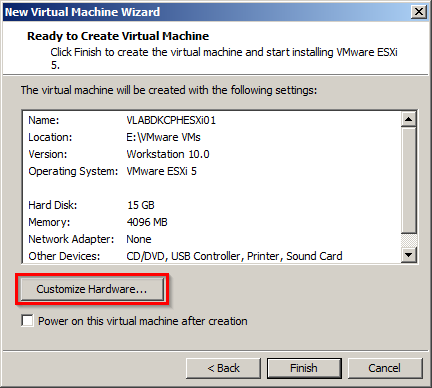
Press Customize Hardware.

2014-04-01 20_10_14-New Virtual Machine Wizard

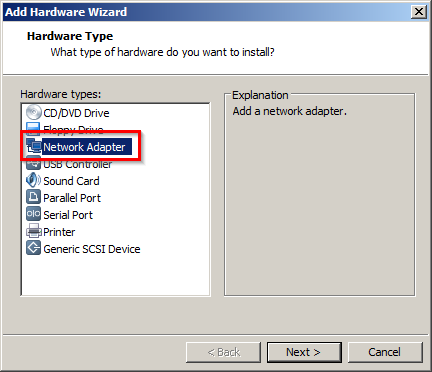
Press Add.

2014-04-01 20_11_05-Hardware

Assign a Network Adapter.

2014-04-01 20_11_49-Add Hardware Wizard

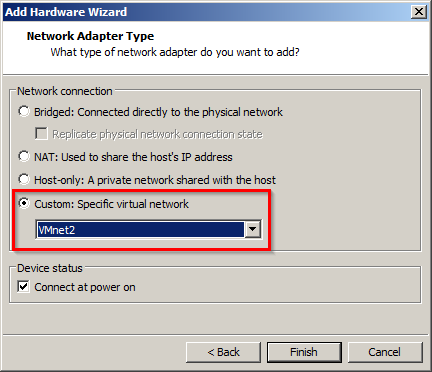
Assign the adapter to the virtual infrastructure VMnet2.

2014-04-01 20_12_27-Add Hardware Wizard

Add another three adapters or more. Can also be added later of course but they will be needed when starting to play with all the stuff inside (vMotion, HA etc..)

2014-04-01 20_13_40-Hardware

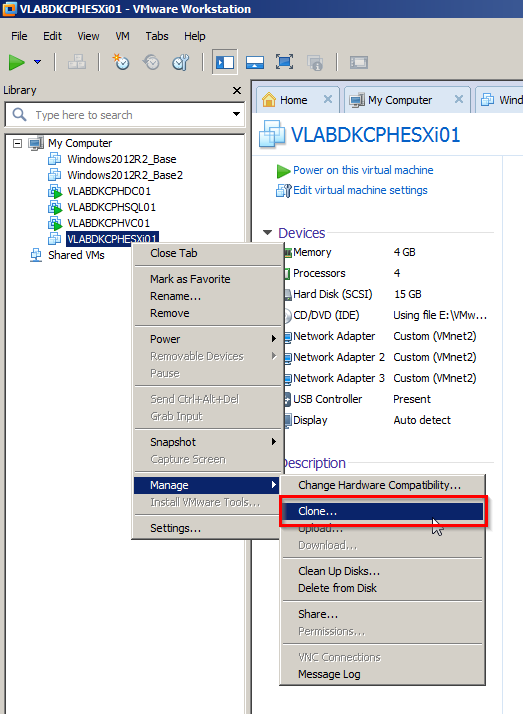
Make a Full Clone of the VM and name it ESXi02.

2014-04-01 20_17_36-VLABDKCPHESXi01 - VMware Workstation

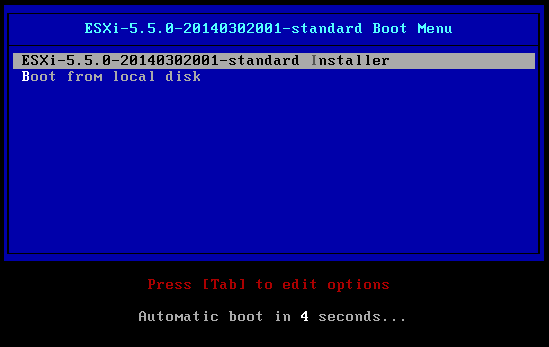
Power ON ESXi01. Awesome;

2014-04-01 20_19_51-VLABDKCPHESXi01 - VMware Workstation

Uh oh! Here comes what I would like to refer to as a bug. I already added and connected several network adapters but for some reason it is not picking it up. Googling this turns out it is a possible bug.

2014-04-01 20_22_50-VLABDKCPHESXi01 - VMware Workstation

To fix this Power OFF the VM and go to the network adapters. Add another adapter and set each of them to a different network (bridged, NAT, Host etc..) Look at the screenshot below. Then Power ON again.

2014-04-01 20_43_54-Virtual Machine Settings

If it does not work then keep playing around by adding and assigning different network adapters to different networks. Eventually it should bite.

2014-04-01 20_45_59-VLABDKCPHESXi01 - VMware Workstation

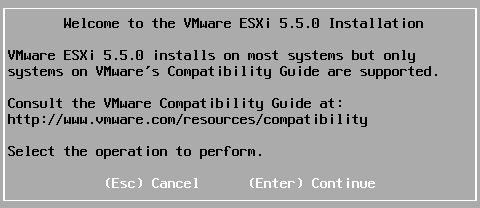
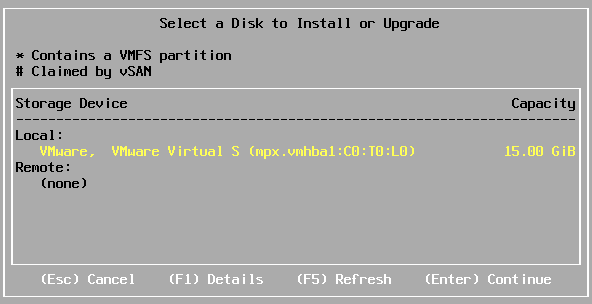
Install the hypervisor onto to the available and chosen local drive.

2014-04-01 20_47_41-VLABDKCPHESXi01 - VMware Workstation

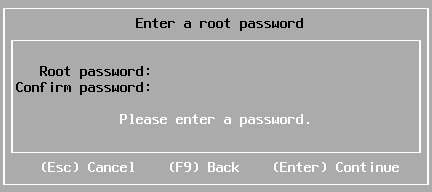
Make a root password.

2014-04-01 20_48_41-VLABDKCPHESXi01 - VMware Workstation

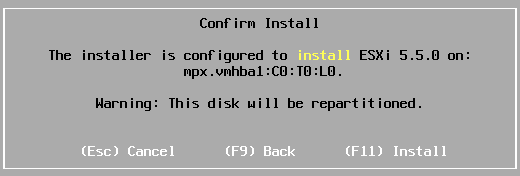
Confirm the repartition by hitting F11.

2014-04-01 20_49_38-VLABDKCPHESXi01 - VMware Workstation

Once it has been installed press F2 to Customize the system.

2014-04-01 20_57_43-VLABDKCPHESXi01 - VMware Workstation

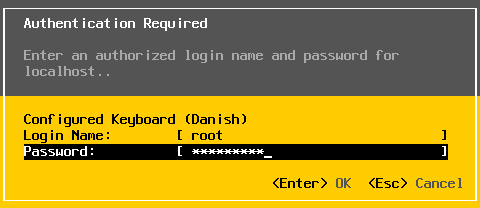
Type the root password.

2014-04-01 20_58_53-VLABDKCPHESXi01 - VMware Workstation

Go to Configure Management Network.

2014-04-01 20_59_34-VLABDKCPHESXi01 - VMware Workstation

Go to Network Adapters.

2014-04-01 21_00_38-VLABDKCPHESXi01 - VMware Workstation

Identify which of the network adapters that worked. First time I did this it was the bridged that worked first, but this time it is the Host-only.

2014-04-01 21_01_47-VLABDKCPHESXi01 - VMware Workstation

Shut down the ESXi and Remove all the other adapters.

2014-04-01 21_14_27-Virtual Machine Settings

Power ON the ESXi again.

Then go into the network adapters again and add 4 network adapters with each their different settings. This finally installed the network adapters for me. Keep add and remove network adapters untill VMware will bite. Eventually it will succeed.

2014-04-01 21_17_02-VLABDKCPHESXi01 - VMware Workstation

Go to IP Configuration.

2014-04-01 21_19_06-VLABDKCPHESXi01 - VMware Workstation

Set a Static IP address and assign one.

2014-04-01 21_20_08-VLABDKCPHESXi01 - VMware Workstation

Go to DNS Configuration.

2014-04-01 21_21_33-VLABDKCPHESXi01 - VMware Workstation

Assign a DNS Server (in my case it is 192.168.0.2 which is my domain controller).

2014-04-01 21_22_26-VLABDKCPHESXi01 - VMware Workstation

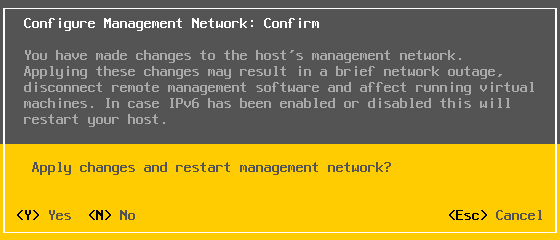
Exit untill it requires a reboot of the management network. Press Y to restart the management network and for the changes to take effect.

2014-04-01 21_23_23-VLABDKCPHESXi01 - VMware Workstation

Repeat this for the ESXi02 but with a different IP address (my 2nd ESXi is 192.168.0.12).

Next create the DNS records by going to the domain controller -> Server Manager -> Tools -> DNS.

2014-04-05 18_59_36-VLABDKCPHDC01 - VMware Workstation

2014-04-05 19_01_10-VLABDKCPHDC01 - VMware Workstation

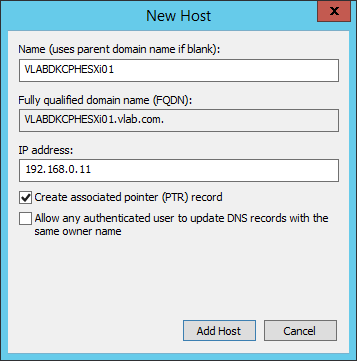
Add both ESXi hosts to the DNS.


Next up: Building a vSphere 5.5 home lab: Part 8 – Add hosts to the vCenter

Building a vSphere 5.5 home lab: Part 1 – VMware Workstation 10 configuration

Building a vSphere 5.5 home lab: Part 2 – Base Template

Building a vSphere 5.5 home lab: Part 3 – Prepare the base template

Building a vSphere 5.5 home lab: Part 4 – Domain Controller

Building a vSphere 5.5 home lab: Part 5 – The SQL Server

Building a vSphere 5.5 home lab: Part 6 – The vCenter Server

Building a vSphere 5.5 home lab: Part 7 – Install Elastic Sky X Integrated

Building a vSphere 5.5 home lab: Part 8 – Add hosts to the vCenter

Building a vSphere 5.5 home lab: Part 9 – iSCSI Storage
Building a vSphere 5.5 home lab: Part 6 – The vCenter Server

So now it is time for the vCenter. Create another linked clone from the base image. I have named mine for VLABDKCPHVC01 and stored it on the SSD. I have given it an IP of 192.168.0.4/24, and the NIC has to be on VMnet2 and the VM has to be joined with the domain.

Create a user named VCAdmin in the active directory and make the user a member of the Local Administrators group on the vCenter server, and then log in with that user.

Once that has been done log onto the SQL Server and open the SQL Management Studio.

Expand Security and right-click Logins and select New Login.

2014-03-30 16_34_52-VLABDKCPHSQL01 - VMware Workstation

Type domain\VCAdmin and press OK.

2014-03-30 16_38_59-VLABDKCPHSQL01 - VMware Workstation

Then right-click Databases and select New Database.

2014-03-30 16_40_47-VLABDKCPHSQL01 - VMware Workstation

Name the database vCenter, make domain\VCAdmin the owner and set the Rows Data to an Initial Size of 100MB.

2014-03-30 16_43_00-VLABDKCPHSQL01 - VMware Workstation

Go to Options and change the recovery model from Full to Simple. I do not do backups of the log and want to keep the space requirements low so I need it to reclaim the log space.
2014-03-30 16_50_36-VLABDKCPHSQL01 - VMware Workstation

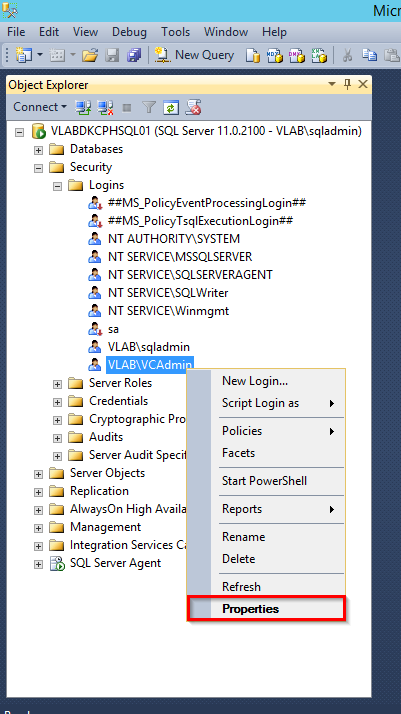
Go to the Properties of the newly created VCAdmin and select User Mapping on the left.

2014-03-30 16_54_59-VLABDKCPHSQL01 - VMware Workstation

Map the msdb database and make the user a db_owner.

2014-03-30 16_57_16-VLABDKCPHSQL01 - VMware Workstation

Next open the Windows Firewall and click Allow an app or feature through Windows Firewall.

2014-03-30 17_32_49-VLABDKCPHSQL01 - VMware Workstation

Click Change settings and then Allow another app.
2014-03-30 17_35_17-VLABDKCPHSQL01 - VMware Workstation

Go to E:\Program Files\Microsoft SQLServer\MSSQL10_50.MSSQLSERVER\MSSQL\Binn\sqlservr.exe and add it to the allowed apps and features list. This should allow the SQL Native Client from the vCenter server to access to SQL database.

2014-03-30 17_38_06-VLABDKCPHSQL01 - VMware Workstation

OBS! Well, allowing the SQL Server program through the firewall does not allow the vCenter to connect to the database alone. In 2012 the firewall has to be configured with more steps to allow this. I spend an hour or so and did not find a solution. I tried to allow the common port 1433 through it but that did not solve it. Instead I had to allow any program from any IP to access the server.

I have done this temporarily although it is not the right way to do it becomes it leaves the network vulnerable.

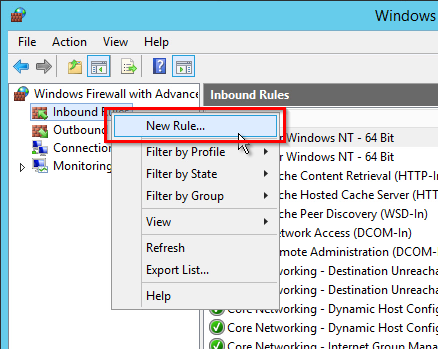
Go to the Windows Firewall and right-click Inbound Rules and select New Rule.

2014-03-30 18_28_03-Camtasia Studio

Choose All programs and click Next.

2014-03-30 18_32_49-Camtasia Studio

Select Allow the connection.

2014-03-30 18_33_44-Camtasia Studio

Select Domain only and click Next.

2014-03-30 18_34_34-Camtasia Studio

Name it All Programs Any IP.

2014-03-30 18_35_24-Camtasia Studio

(more…)