Managing Microsoft ressource

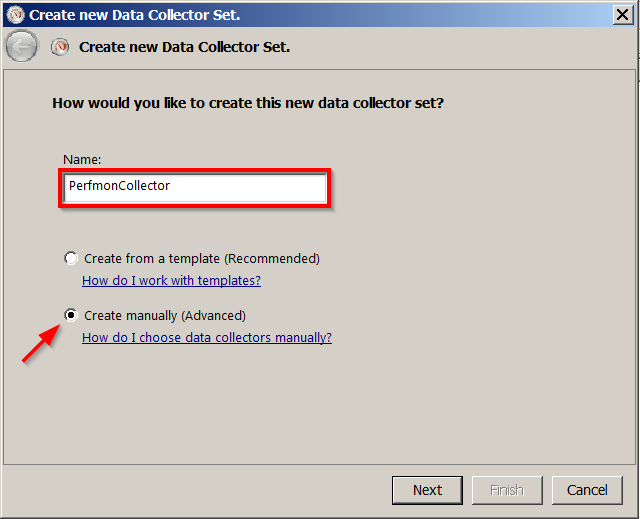
Ooooh dear Microsoft.. We’re in 2022 and still I have to run Powershell commands on a M365 ressource for something I kinda see as standard. Or rather I think this should and could be handled much smarter.

Say you have a ressource named “Meeting room” used for booking a physical room somewhere down the hallway.

Recurring meeting that conflict with just a single meeting will reject the recurring meeting entirely. To avoid this you might be tempted to enable

Set-CalendarProcessing “Meeting toom” -AllowConflicts $true

But that will allow double bookings and isn’t the greatest.

Firstly, some tenants may not receive e-mail confirmations when a ressource is booked, so run this:

Set-CalendarProcessing “Mødelokale” -ProcessExternalMeetingMessages $True

Next, to modify the behaviour of the ressource to allow a recurring meeting that still conflicts, run:

Set-CalendarProcessing “Meeting room” -ConflictPercentageAllowed 80

Set-CalendarProcessing “Meeting room” -MaximumConflictInstances 10

Above commands will allow the person who booked to receive confirmation emails for accepted dates, and confirmation emails for dates rejected because there was a conflict. Obviously, the above commands allows 10 maximum conflicts, or up to 80% conflicts, exceeding those parameters and the recurring meeting will be rejected entirely.

More on the subject here but the essence is;

So, for example, say a room mailbox is configured with the following settings:

AutomateProcessing : AutoAccept
AllowConflicts : False
AllowRecurringMeetings : True
ConflictPercentageAllowed : 40
MaximumConflictInstances : 6

  1. A recurring meeting request which repeats 10 times (10 instances) is sent to the mailbox. Now let’s suppose 5 out of 10 (or half) of the instances for that recurring meeting occur at the same time other meetings are scheduled in the calendar. In this case, the 50% conflict ratio exceeds the ConflictPercentageAllowed setting of 40.
    The result: The entire meeting request is rejected and the room sends a message back to the meeting organizer with the subject Declined All. The five conflicting instances are declined, as are the other five instances that didn’t conflict with another meeting.
  2. Another meeting request is sent where there are 100 instances of a recurring meeting and 10 of them conflict with existing bookings. In this case the ConflictPercentageAllowed is not exceeded by the 10% conflict rate. However, we exceed the MaximumConflictInstances setting of 6.
    The result: Once again, the entire meeting request is rejected and all 100 instances are declined.
  3. For our last example, a recurring meeting request comes to this room where there are 10 instances and only 2 of them conflict with existing bookings.
    The result: Since we don’t exceed either MaximumConflictInstances or ConflictPercentageAllowed, the room mailbox accepts the recurring meeting request series but declines to book the two instances that conflict. The meeting instances that don’t conflict are accepted and booked and the room sends three emails back to the organizer, one with Accepted in the subject stating the recurring meeting request was accepted, and two with Declined in the subject for the two conflicting instances.

So by these examples we see how a recurring meeting request with conflicting instances can be accepted or declined based on the calendar processing settings. However, it’s important to repeat that a recurring meeting request instance that conflicts with another booking is ALWAYS declined.

How to apply Windows domain wallpaper server 2016

I find it best to copy the wallpaper to a domain user’s local computer, so that the background does not turn black if the domain is unavailable – like when you bring the laptop with you on a trip.

  • Go to \\servername\sysvol and place the wallpaper file within the SYSVOL folder.
  • Create a GPO User Configuration > Preferences > Windows Settings > Files.

Source file(s): \\servername\sysvol\image1.jpg
Destination File: C:\Windows\Web\Wallpaper\Windows\image1.jpg

Note that the destination file field also has to contain the name for the file you want.

GPO1

Then go to User Configuration > Policies > Administrative Templates > Control Panel > Desktop > Desktop > Desktop Wallpaper, and set

C:\Windows\Web\Wallpaper\Windows\image1.png.

GPO2

Ping with a script

I was asked to make a script for monitoring and troubleshooting a network with communication issues. A script that would continuously ping a host server and write the timeouts to a file. I cannot script on my own though, so I went for professor Google, and I found something I want to keep for the future.

Salmon Trout posted it here

I’ll be posting 3 variants of the script, and for the below examples of the output files I have used two virtual servers. One has the IP address 192.168.1.101, which I am pinging from, and the other 192.168.1.105, which I am pinging to. I simply disabled the NIC on 192.168.1.105 to simulate timeouts.

Script 1

This script will continuously ping an end device, and will output every successful and not successful reply to a file.

hostIp      = wscript.arguments(0)
logfilename = wscript.arguments(1)
Set fso     = CreateObject(“Scripting.FileSystemObject”)
Set Shell   = CreateObject(“Wscript.Shell”)
Set logfile = fso.OpenTextFile(logfilename, 8, True)
shellstring = “%comspec% /c ping -t ” & hostIP
Set oExec   = Shell.Exec(shellstring)
wscript.echo “Ping Error log With Timestamp – Ctrl + C to halt”
Do While oExec.StdOut.AtEndOfStream <> True
        pingline = Date & ” ” & Time & ” ” & oExec.StdOut.ReadLine
        If Not InStr(pingline, “TTL=”) Then
            logfile.WriteLine(pingline)
        End If
Loop

Example:

24-01-2017 18:17:11
24-01-2017 18:17:11 Pinging 192.168.1.105 with 32 bytes of data:
24-01-2017 18:17:11 Reply from 192.168.1.105: bytes=32 time<1ms TTL=128
24-01-2017 18:17:12 Reply from 192.168.1.105: bytes=32 time<1ms TTL=128
24-01-2017 18:17:13 Reply from 192.168.1.105: bytes=32 time<1ms TTL=128
24-01-2017 18:17:14 Reply from 192.168.1.105: bytes=32 time<1ms TTL=128
24-01-2017 18:17:15 Request timed out.
24-01-2017 18:17:16 Request timed out.
24-01-2017 18:17:17 Request timed out.
24-01-2017 18:17:18 Reply from 192.168.1.105: bytes=32 time<1ms TTL=128
24-01-2017 18:17:19 Reply from 192.168.1.105: bytes=32 time<1ms TTL=128
24-01-2017 18:17:20 Reply from 192.168.1.105: bytes=32 time<1ms TTL=128
24-01-2017 18:17:21 Reply from 192.168.1.105: bytes=32 time<1ms TTL=128
24-01-2017 18:17:22 Ping statistics for 192.168.1.105:
24-01-2017 18:17:23     Packets: Sent = 26, Received = 23, Lost = 3 (11% loss),
24-01-2017 18:17:28 Approximate round trip times in milli-seconds:
24-01-2017 18:17:33     Minimum = 0ms, Maximum = 0ms, Average = 0ms
24-01-2017 18:17:38 Control-C

Script 2

This script will continuously ping an end device, and will output only failed replies to a text file. This will conserve disk space.

hostIp      = wscript.arguments(0)
logfilename = wscript.arguments(1)
Set fso     = CreateObject(“Scripting.FileSystemObject”)
Set Shell   = CreateObject(“Wscript.Shell”)
‘ OpenTextFile Method requires a Const value
‘ (Over)Write = 2  Append = 8   
Set logfile = fso.OpenTextFile(logfilename, 8, True)
shellstring = “%comspec% /c ping -t ” & hostIP
Set oExec   = Shell.Exec(shellstring)
wscript.echo “Ping Error log With Timestamp – Ctrl + C to halt”
Do While oExec.StdOut.AtEndOfStream <> True
      pingline = Date & ” ” & Time & ” ” & oExec.StdOut.ReadLine
      If InStr(pingline, “TTL=”) = 0 Then
         logfile.WriteLine(pingline)
      End If
Loop

Example:

24-01-2017 18:29:44
24-01-2017 18:29:44 Pinging 192.168.1.105 with 32 bytes of data:
24-01-2017 18:30:03 Request timed out.
24-01-2017 18:30:08 Request timed out.
24-01-2017 18:30:13 Request timed out.
24-01-2017 18:30:23
24-01-2017 18:30:23 Ping statistics for 192.168.1.105:
24-01-2017 18:30:23     Packets: Sent = 27, Received = 24, Lost = 3 (11% loss),
24-01-2017 18:30:23 Approximate round trip times in milli-seconds:
24-01-2017 18:30:23     Minimum = 0ms, Maximum = 0ms, Average = 0ms
24-01-2017 18:30:23 Control-C

Script 3

This script will continuously ping an end device, and will output all failed replies, and successful replies once every minute. This will conserve disk space.

hostIp      = wscript.arguments(0)
logfilename = wscript.arguments(1)
Set fso     = CreateObject(“Scripting.FileSystemObject”)
Set Shell   = CreateObject(“Wscript.Shell”)
‘ OpenTextFile Method requires a Const value
‘ (Over)Write = 2  Append = 8   
Set logfile = fso.OpenTextFile(logfilename, 8, True)
dateminuteOLD = “xx”
dateminuteNEW = “xx”
shellstring = “%comspec% /c ping -t ” & hostIP
Set oExec   = Shell.Exec(shellstring)
wscript.echo “Ping Error log With Timestamp – Ctrl + C to halt”
Do While oExec.StdOut.AtEndOfStream <> True
      pingline = Date & ” ” & Time & ” ” & oExec.StdOut.ReadLine
      If InStr(pingline, “TTL=”) = 0 Then
         logfile.WriteLine(pingline)
      End If
pingline = Date & ” ” & Time & ” ” & oExec.StdOut.ReadLine
dateminuteNEW = left(pingline, 16)

    if dateminuteNEW <> dateminuteOLD then
        logfile.WriteLine(pingline)
    End if
dateminuteOLD = dateminuteNEW

Loop

Example:

24-01-2017 13:30:31
24-01-2017 13:30:31 Pinging 192.168.1.105 with 32 bytes of data:
24-01-2017 13:31:00 Reply from 192.168.1.105: bytes=32 time<1ms TTL=128
24-01-2017 13:31:08 Ping statistics for 192.168.1.105:
24-01-2017 13:31:08 Approximate round trip times in milli-seconds:
24-01-2017 13:31:08 Control-C
24-01-2017 18:32:52
24-01-2017 18:32:52 Pinging 192.168.1.105 with 32 bytes of data:
24-01-2017 18:33:00 Reply from 192.168.1.105: bytes=32 time<1ms TTL=128
24-01-2017 18:34:01 Reply from 192.168.1.105: bytes=32 time<1ms TTL=128
24-01-2017 18:35:00 Reply from 192.168.1.105: bytes=32 time<1ms TTL=128
24-01-2017 18:35:49 Request timed out.
24-01-2017 18:35:59 Request timed out.
24-01-2017 18:36:02 Reply from 192.168.1.105: bytes=32 time<1ms TTL=128
24-01-2017 18:37:01 Reply from 192.168.1.105: bytes=32 time<1ms TTL=128
24-01-2017 18:37:39
24-01-2017 18:37:39     Packets: Sent = 270, Received = 267, Lost = 3 (1% loss),
24-01-2017 18:37:39     Minimum = 0ms, Maximum = 2647ms, Average = 9ms

How to use the script

Copy the script content into notepad, and save it as pingtest3.vbs in a folder eg. c:\Pingtest

1

2

Open Notepad and type c:\windows\system32\cscript.exe C:\Pingtest\pingtest3.vbs 192.168.1.105 pingtest3.txt into the file, and then save it as Scriptcall3.bat in the same folder as the script. It is in this argument you define the name of the output file and which host you want to ping, and not in the script itself.

3

4

Now, simply execute Scriptcall3.bat to run the script.

5

How to configure DHCP in Cisco IOS

Switch(config)#ip dhcp excluded-address 192.168.1.1 192.168.1.50
Switch(config)#ip dhcp pool Marketing
Switch(dhcp-config)#network 192.168.1.0 255.255.255.0
Switch(dhcp-config)#default-router 192.168.1.1
Switch(dhcp-config)#dns-server 192.168.1.5
Switch(dhcp-config)#exit
Switch(config)#

You have to know the network and its mask, and then start by excluding a desired IP range from the scope (if any). Remember to assign the default router and DNS if any exists.

It is possible to forward DHCP requests to other networks if you have a router. Here is how you configure DHCP relay on a router’s interface:

ip-helper


How to configure GPO Security Filtering

So I have spend quite a few hours researching the GPO Security Filtering, and followed a good bunch of reliable sources in my attempt to get it to work properly. None of the sources made it work, and some of them were:

Purpose of the Security Filtering

I applied a GPO to an OU with a handful of users, but I wanted the GPO to target only a subset of the users in the OU. So I wanted the GPO to target a group, where user members of that group would have the GPO applied.

How Security Filtering works

But a GPO does not process a Security Group. It process users and computers, but Security Filtering allows me to “scope” the GPO so that it applies only to members of the security group.

How to configure Security Filtering on a Security Group

For this test I used Server 2012 R2 domain controller, and two Windows 10 Pro each joined to the domain.

  1. Create an OU with user accounts inside.
  2. Create a Security Group and make the users you wish to be targeted by the GPO member of it. It does not matter if the Security Group is inside the OU or not. It can be anywhere in the domain, as long as the users themselves are in the OU.
  3. Create a GPO and link it to the new OU (right-click OU and select “Create a GPO in this domain, and link it here”.)
  4. Edit the GPO and make the desired changes. In this example I am going to Prohibit access to the control panel in User Configuration > Policies > Administrative Templates > Control Panel, and then enable Prohibit access to Control Panel and PC settings.
  5. Now, in the gpmc.exe of the new GPO go to the Delegation tab and press Advanced.
  6. Select Authenticated Users and remove Apply Group Policy, while still allowing Read. Authenticated Users consists of both users and computers, and the GPO is processed by both even though it is only a user configuration policy.
  7. Add the security group to the list and allow Read and Apply Group Policy, and then verify that the Security Group with the user members you wish to be targeted by the GPO is in the Security Filtering of the Scope tab.
  8. Next, reboot the target computer and login.
  9. Sign out and sign in.

Step 8 and 9 had me confused since I thought a gpupdate /force in an elavated command prompt on the target computer would be enough. For this specific GPO setting though, I did 50+ tests to confirm even a reboot was not enough. I had to actually reboot + sign in, and then sign out and sign back in. I could also sign out and sign in, and then reboot and sign in… And then it’d work. No other constellation, with or without gpupdate /force worked for me. Gpupdate /force did nothing.

So I learned that gpupdate /force is not always reliable, and some GPO settings will need a reboot and “re-logins”…. Thanks Bill Gates..

So, having done this right I can now move domain members in and out of the security group based on whether I’d like the GPO applied to them or not. Just make sure all users are within the OU that has the GPO linked.

Example: If I wanted to make a new user Mark Anderson targeted by the GPO, I would then move him to the respective OU, join him to the Security Group, reboot the domain computer, sign into the computer as Mark, sign back out, sign back in as Mark again, and then it would work.

Pictures here:

123456

How to recover from lost passwords on a Cisco router or switch

Change the configuration register value to 0x2142 on the router or switch to prevent it from loading the configuration file stored in NVRAM upon boot, and instead boot it into setup mode.

  • First boot the router into ROM monitor mode by entering Ctrl+Break upon boot. 
System Bootstrap, Version 15.1(4)M4, RELEASE SOFTWARE (fc1)
Technical Support: http://www.cisco.com/techsupport
Copyright (c) 2010 by cisco Systems, Inc.
Total memory size = 512 MB - On-board = 512 MB, DIMM0 = 0 MB
CISCO2911/K9 platform with 524288 Kbytes of main memory
Main memory is configured to 72/-1(On-board/DIMM0) bit mode with ECC disabled
Readonly ROMMON initialized
program load complete, entry point: 0x80803000, size: 0x1b340
IOS Image Load Test
___________________
Digitally Signed Release Software
 program load complete, entry point: 0x81000000, size: 0x3bcd3d8
 Self decompressing the image :
 ###########                                                             (press Ctrl+Break here)
 monitor: command "boot" aborted due to user interrupt
  • Change the configuration register value at the ROM Monitor mode and then reset it.

rommon 1 > confreg 0x2142 rommon 2 > reset

System Bootstrap, Version 15.1(4)M4, RELEASE SOFTWARE (fc1)
Technical Support: http://www.cisco.com/techsupport
Copyright (c) 2010 by cisco Systems, Inc.
Total memory size = 512 MB - On-board = 512 MB, DIMM0 = 0 MB
CISCO2911/K9 platform with 524288 Kbytes of main memory
Main memory is configured to 72/-1(On-board/DIMM0) bit mode with ECC disabled
[output cut]
  • Type no at setup mode.
--- System Configuration Dialog ---

Continue with configuration dialog? [yes/no]: no

Press RETURN to get started!

  • Copy the startup-config to the running-config by using copy start run.

Router>en Router#copy start run

Destination filename [running-config]? 793 bytes copied in 0.416 secs (1906 bytes/sec) CoreRouter#

  • At this point there has been no password prompt. Replace any passwords on the lines or the privileged mode.

CoreRouter#conf t CoreRouter(config)#enable secret iForgotMyPassword

  • Revert back to the default configuration register of 0x2102.

CoreRouter(config)#config-register 0x2102 CoreRouter(config)#exit CoreRouter#

  • Write the running configuration file to NVRAM.

CoreRouter#wr Building configuration… [OK]

  • Reboot the box by using the reload command.

CoreRouter#reload

How to offline activate Server 2012 R2

  • Open a command prompt and install the key with slmgr -ipk XXXXX-XXXXX-XXXXX-XXXXX-XXXXX.

1

  • In a command prompt type slui 4 to activate phone system Windows activation. Without a key installed first this would not be possible.

2

  • Choose region.

3

  • Call the number on the instructions page and provide the installation ID.

4

  • Provide the generated confirmation ID.

5

6

7


How to performance test an IT infrastructure

During the summer I received a task on my desk to test performance on a newly built VMware IT infrastructure. The most common way of doing this seems to be  through the measuring of IOPS – Input and Output per Seconds. It doesn’t make much sense to just test ‘performance’ through IOPS on a system. You will need some kind of baseline, or customer requirement, or expected workload on the VMware platform / IT infrastructure to properly assess the infrastructure capacity and performance against the requirements.

As an example: An IT infrastructure of 3 to 4 physical servers had to be migrated onto a VMware platform. You want to make sure the VMware platform has enough performance and capacity to carry the workload of the 3 to 4 Windows servers (the old IT infrastructure). Usually some theoretical calculations and thoughts are placed on the table prior to building the VMware platform, but you can also do this post installation. You test the performance on the old IT infrastructure to get an idea of IOPS Read/Write workload, and then use this baseline as a comparison.

Most appealing to me was Kevin Franklin’s blog post on measuring IOPS for Windows found here: Kevin Franklin’s How to measure IOPS for Windows

Kevin provides some good insight and details into Windows and computer performance, and although I am sure there are other good 3rd party software for infrastructure performance testing I went with his method as a base for my own testing;

  • Get IOPS on old IT infrastructure (All or some of the most common, or heavy loaded Windows servers)
  • Analyze the IOPS result and get an idea of workload
  • Use IOmeter on a virtualized Windows server on VMware platform and input workload result from physical servers into IOmeter. Discuss the end IOPS result.

This is not a finished guide, but more of an idea of how I worked with Excel to convert the data. You will have to read Kevin’s blog post, and download the material to completely understand and use it. I only made this because I felt Kevin was missing the hard part – which is working with the data in Excel. I received help from colleagues since Excel is definitely not my strong side.

  • Launch the perfmon.exe either through Run or a command prompt. Go to Data Collector Sets > User Defined, right-click and select New > Data Collector Set.

1

  • If on an XP or server 2003 machine then expand Performance Logs and Alerts and right-click Counter Logs and select New Log Settings.

2

  • Name the new data collector and select Create manually (Advanced).

3

  • Select Create data logs and check Performance counter.

4

  • Open the DataCollector01.

5


Change the log format to Comma Separated, set the sample interval as desired and change the Maximum samples to 86400.

Note: In the original article Kevin Franklin suggests using a sample interval of 1 second. This means it will log counters every second, but according to some this will tax the system.

I made a few tests and I found no differences in performance between an interval of 1 second or 5 seconds. The perfmon collector seems to be reserving 5 – 10mb of memory and 0 – 2% CPU on the XP system I tested on no matter what setting I chose.

The maximum samples is a measurement in seconds and is a means to put a limit on how long the collector should log data. Some people suggest a runtime of minimum one week, and others believe 1 – 2 days are fine as long as it is done in a time where the system is on a heavy load. 86400 seconds are two days.

12 hours of logging requires approximately 15 – 30mb of disk space.

6

  • Next press Add and select the following counters:
  1. \Processor Information\%Processor Time
  2. \Memory\Available Mbytes
  3. \Logical Disk\
    1. Avg Disk Bytes/Read
    2. Avg Disk Bytes/Transfer
    3. Avg Disk Bytes/Write
    4. Avg Disk Sec/Read
    5. Avg Disk Sec/Transfer
    6. Avg Disk Sec/Write
    7. Disk Bytes/Sec
    8. Disk Read Bytes/Sec
    9. Disk Reads/Sec
    10. DiskTransfers/Sec
    11. Disk Write Bytes/Sec
    12. Disk Writes/Sec
  • You can change the name of the log file under File and also see where it is placed by default.

Note: If you are on an XP or server 2003 machine then be careful placing the file in the root of the C:\ drive. The perfmon service is run by a network service account which does not have write access to the root C drive, so you must create a folder to be able to run the data collector.

7

  • Import the data into Excel once it has been collected.

8

We first have to format the date and time stamps, and then copy those into the BuildWorkSheet-Blank Excel document. After this we will format and convert the rest of the data.

  • Press Ctrl+A to mark all the data.

9

  • Once all the data has been selected go to the Data tab and press Text to Columns.

10

  • Select Delimited and press Next.

11

  • Select Comma.

12

  • Leave everything at default and press Finish.

13

  • Create a new column and in the cell next to the first time stamp create an equal sign, and then click Insert Function.

14

  • Select Text as the category and Left as the function and then press OK.

15

  • In Text select the cell.

16

  • And press Enter.

17

  • In the Num_chars type 19 and press OK. This will reduce the number of characters to 19 starting from the left.

18

  • Double-click the formula to expand it to the rest of the cells.

19

  • Now copy the data to the Time value field in the BuildWorkSheet-Blank Excel document. To do this in an easy way select the first cell and hold Shift and press End and then press Arrow down to quickly select the entire column with data values only.

20

  • Copy the cell values only and not the entire formula.

21

  • Copy-paste the values into the BuildWorkSheet-Blank.

22

Next up is to convert the rest of the data. Close the document without saving or undo all of the previous actions. Repeat the previous steps as follows;

  1. Select all data by hitting Ctrl+A.
  2. Go to the Data tab and select Text to Columns.
  3. Select Delimited.
  4. Select Comma.
  • Go to Advanced.

23

  • Set the decimal separator to dot and the thousands separator to comma, and then press OK and Finish.

24

  • Right-click column B and insert a new column.

25

  • Convert the bytes to megabytes.

26

  • Mark the new B column, right-click it and select Format Cells.

28

  • Go to the Number tab and select Number. Then check Use 1000 Separator (.) and press OK.

29

  • Simply double-click the lower right corner of the cell to copy the formula to the remaining rows.

30

  • To properly convert the latency readings Disk sec/Read (Latency ms) to milliseconds create another column and multiply the value by 1000.

31

  • Select the entire column and format the cells to show only the desired decimals.

32

  • The Disk Reads/sec are the IOPS read value, and simply format the cells to show only 2 decimals to convert to the correct value.

33

  • To get the memory utilization in percentage first subtract the total amount of memory by the Available MBytes value, and then divide that by the total amount of memory available and multiply by 100.

34

How to convert .tib to .vmdk

First create a bootable ISO with Acronis Backup and Recovery. Acronis Backup and Recovery 10 was used for this guide. It should also be possible to use Acronis’ newer version of bootable restore with Acronis Universal Restore.

You will also need a copy of VMware Workstation and create and use a virtual machine to boot the Acronis Backup and Recovery 10 ISO on.

It was possible to convert .TIB to .VHD In Acronis True Image Backup 2014 and below, but that feature was removed in version 2015.

1


  • In VMware Workstation create a new custom virtual machine.

If you have VMware Workstation 11 and select typical the hardware version will be 10, and such a VM can only be edited from an ESXi 5.5 managed through a vCenter with the Web Client installed. Therefore do not select typical.

2


  • Select Workstation 8.

3


  • Mount the Acronis ISO image.

4


  • Select Other as the operating system and version.

5


  • Choose a VM name and location.

6


  •  Fast forward to the final VM settings select Customize Hardware.

15


  • Add a USB Controller to the VM. You want this so you can connect the external HD with the .TIB files on to the new VM.

16


  • Turn on the new VM and let it boot on Acronis B&R 10 ISO.

17


  • Select Run management console.

18


  • Select Recover.

19


  • Right-click the new VM in Workstation and go to Removable Devices > Select USB with .TIB files on > Connect (Disconnect from Host).

20


  • Press Change.

21


  • Navigate to the .tib file desired to be restored.

22


  • Press change to select the data to be restored.

23


  • Select the data from the .tib file to be restored.

24


  • Press change to select where to recover the data to.

25


  • Press OK to start the restore.

26


Once done simply reboot the VM and hope it doesn’t BSOD 🙂